Sally’s Baking Addiction: December, 2019 Challenge: Homemade Butter Cookies🍪

I’m Baaaack!! So I had some technical difficulties with WordPress, for a couple months 🤨  I did keep going with the baking challenges but I didn’t get to post them in a timely manner.

I also was not able to comment or “like” most of the blogs I follow, so I am so sorry that I have been absent for so long 😔 But I will be trying to make it up to all of you!

So, now I must take you back to Christmas time for this baking challenge. 🎄Sorry!

Sally’s challenge for December was to make homemade butter cookies. I think many of you will remember these as spritz cookies. They are usually made with a special piece of culinary equipment that, quite frankly, never work! Fortunatley, Sally did not make us buy this antiquated piece of crap 😂

IMG_2288

Since this was a rather simple recipe, the dough came together rather quickly

IMG_2249

The most important part of combining the ingredients is the addition of the milk. The piping consistency of this dough is important. It needs to be thin enough to move through the piping tip, but thick enough to hold the shape after piping. So, add the milk a tablespoon at a time.

I used the largest tip that I had and, after chilling the dough for several hours, piped them onto a parchment lined baking sheet.

IMG_2250

These were baked at 350F for 15 minutes.

IMG_2255

IMG_2272

These were cooled, and then I decided to dip them into melted chocolate and added sprinkles

IMG_2273

IMG_2287

IMG_2286

They were buttery, and full of almond and vanilla flavor! 😋

So happy to be back online with you all!!!


Sally’s Baking Addiction: November, 2019 Challenge: Pecan Praline Pumpkin Pie 🥧

Well, it finally happened! It is December 6th and I am just now posting about a baking challenge that happened last month 😳 I am not sure why I let this go so long! I have not been motivated to post lately. I know many of us bloggers go through this from time to time, I guess it’s my turn now.

November is host to the most food centric holiday in the US, of course I am referring to Thanksgiving 🦃 🥧👩🏻‍🍳 and Sally did not disappoint with her challenge this year. Her Pecan Praline Pumpkin Pie combines two Thanksgiving favs, pecan and pumpkin pie.

IMG_1680

I admit, I am not a big pie fan to begin with, but I do want to be able to bake pies for the ones I love. What is great about this combination is that there is the crunch of the praline pecan topping, which is offset by the smooth creamy pumpkin component. While I still do not like each pie separately, I really did enjoy the hybrid results 😋

I was really pressed for time this year, and did most of my baking concurrently, which is a long way of saying that I didn’t take a lot of production pictures! In fact, the only real pictures I have were taken by my friend Joan. Joan has Celiac’s and asked me to make a couple traditional pie crusts, so she could take regular pies to her Thanksgiving dinner. She snapped a couple shots of me rolling out dough.

This is Sally’s favorite pie crust, and I recommend it! I did not know Joan was taking pics!!

The pumpkin custard was added and baked for about 30 minutes at 375F. Then the pecan praline topping was added and baked for the final 15 minutes.

IMG_1647 copy

This was one of two pies I made for our dinner, the other was an apple pie with cinnamon roll crust.

IMG_1646 copy

I decided to garnish with maple whipped cream and Dulce de Leche Macarons.

I found this recipe on Pinterest

IMG_1642

This was my first time baking Macarons, I will get a bigger tip next time 😉

IMG_1679


IMG_1681


IMG_1677 copy

And off to my brother in laws for dinner!

IMG_1696


IMG_1795


IMG_1693

My oldest nephew, Nicholas, photo bombing me!

We ate, drank and had a great time! I hope all my American friends enjoyed their time with family and friends as well ❤️

I will try to do a better job of posting in the future🤞


Sally’s Baking Addiction: October, 2019 Challenge: Homemade Caramel Apples 🍎

IMG_0253

It’s October, the month of Pumpkin spice 🎃, Halloween 👻 and falling leaves  🍁

It’s also time for another baking challenge from Sally’s Baking Addiction, and she set us the task of making homemade caramel apples.🍏

This turned out to be quite easy, and the best part is this caramel sauce, which is great on EVERYTHING 😋

To make the caramel sauce: First add the heavy cream, light corn syrup, brown sugar, butter and salt in a heavy bottom sauce pan

IMG_0239

Stir over medium high heat until all the components are mixed and the butter is melted

IMG_0242

At this point stop stirring, insert a candy thermometer and heat until 235F. The caramel will bubble up the sides of the pot, using a pastry brush and cold water, brush down the sides of the pot, every so often, to prevent sugar crystals from forming in the sauce.

It can take a bit for the caramel to get to 235F (also known as the soft ball stage) so be patient! Don’t walk away or turn up the heat.

The following images are the progression of the sauce as it made its way to 235F

IMG_0243


IMG_0244


IMG_0245


IMG_0246


IMG_0247


IMG_0248

It is ready!

While the sauce cooled and thickened, the apples were prepped. For me, this was the hard part😂 Getting those sticks in the apples was a little harder than I thought it would be!

Apples purchased in the store usually have a wax coating which needs to be removed to help the caramel stick to the surface. Even so, after they were washed, scrubbed and dried, there were still slippage issues! I ended up double dipping them in the sauce.

IMG_0249

Cleaned and scrubbed


IMG_0250

I finally got the sticks in 🍏🍎🍏

Time to dip!

IMG_0253


IMG_0252


IMG_0256

This is a pretty messy process, so I made sure to wear one of the aprons sent to me by my blog buddies!!

IMG_0257

Check out their fabulous designs in their online shop, Fashioned by Nature!


38CADB51-6579-456A-804B-26B4F03B0DA5

This was the end of the challenge, and the apples tasted pretty great. But, I decided to go another step further and dip them in chocolate 🍫

IMG_0263


IMG_0259

This was messy but quite tasty😋

Looking forward to the holidays and whatever Sally has in store for us!!!

Sally’s Baking Addiction: September, 2019 Challenge: Homemade Cheese Bread

bread

Well, this is different! I usually do not post my baking challenge experience until the last day of the month 😂 But this September is a little special. We are leaving soon for Greece 🇬🇷 ! We won’t be back until the first week in October, so I had to be a little faster with my baking this month!

Fortunately, this was a bread challenge, and aligned well with our family, the cooler weather and the Seahawks home opener🏈

Sally’s version of this homemade cheese bread is extra soft, as it is an enriched dough, made with buttermilk, egg and butter (and lots of cheese🧀).

The first step was to mix warm buttermilk, warm water, sugar and instant yeast.

IMG_9067

This was left for 5 minutes to activate the instant yeast, then 1 cup of bread flour was added, along with the butter, egg and salt. Sally used garlic powder in her recipe but I did not since I was paring this with chicken chili for dinner 😋

IMG_9068

The rest of the bread flour went into the mixing bowl, which was fitted with a dough hook.

IMG_9070

I let the mixer do the work of kneading the dough. I do have to say that this was a wonderful bread dough to work with😊 It was soft and pliable and came together easily!

IMG_9071

I formed it into a ball and placed it in a greased bowl so it could prove. It needed to double in size, which took almost two hours in my cool, Fall kitchen.

IMG_9073

Before proving


IMG_9075

Tucked in for the 2 hour rest

The dough was punched down, and rolled into a 9 X 15 inch rectangle

And this is where the cheese come into play 🧀 2 cups total! I chose to use sharp, white cheddar and smoked cheddar (1 cup each).


IMG_9076


IMG_9078

The cheese was pressed into the rectangle

IMG_9081

This was where the processes gets messy! Starting with the long side, the dough is rolled into a log

FullSizeRender-3

If you have ever made a babka loaf, then you are familiar with this part. I have blogged about this before here. The log is cut, longitudinally and then wrapped around itself.

I needed both my hands for this, so I was not able to take my own pics. But, fortunately Sally had some great shots of this process!

chese-bread-step-photos

From Sally’s Baking Addiction Site

Here is how mine looked

IMG_9084

The loaf was placed into a greased 9 X 5 inch loaf pan and left to prove for a second time.

IMG_9085

The loaf was brushed with melted butter and chopped parsley.

bread

IMG_9089

And into a 350F oven for 50 minutes

IMG_9091

Very easy! And, more importantly, delicious 😍

IMG_9096


IMG_9098

And it went great with the chicken chili that night!

IMG_9109

Another excellent Sally recipe 👩🏻‍🍳

Sally’s Baking Addiction: August, 2019 Challenge: Lemon🍋 and Blueberry Vertical Cake👩🏻‍🍳

IMG_8760

This August Sally presented us with a rather unique challenge. A vertical cake, where the layers are standing on end, instead of horizontal.  I had never heard of such a thing, much less attempted such a creation.

This challenge was more about the process than the end product, which is great because my cake was not one of my best looking 😂

IMG_8790

See what I mean?

But let me tell you how to make it, and then you can fix my mistakes!!

Ultimately, this is a roll cake. I have blogged about these before here, and I am forturnate in that I am comfortable making this type of sponge cake (it did make this an easier challenge for me).

The first thing was to make sure this cake will come out of the pan! A full sheet pan needs to be greased, parchment paper added, greased again and finally, a layer of flour was sifted over everything.

IMG_8711

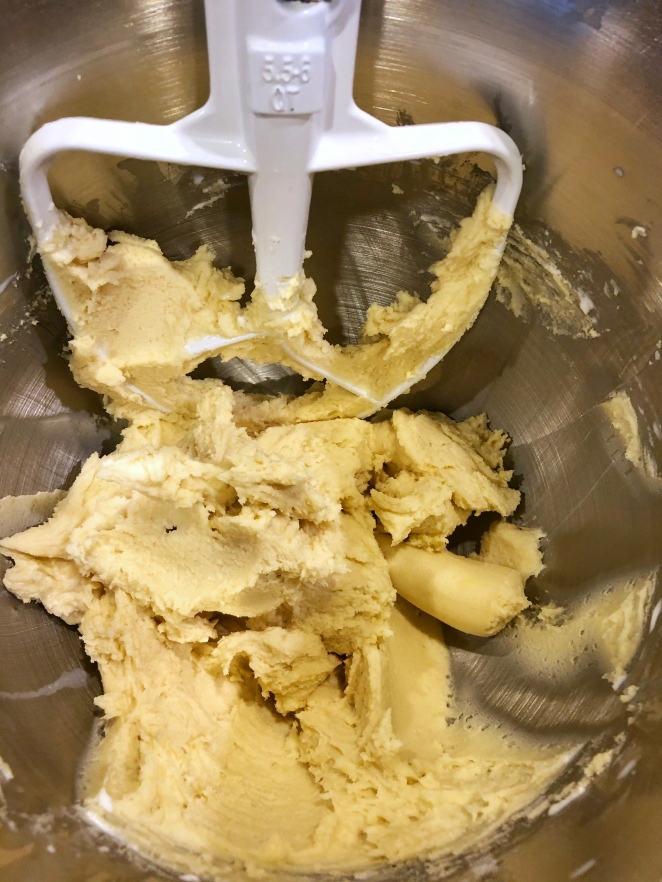
The next critical step was to make sure there was plenty of volume in the eggs (which is the only leveling in this cake).

IMG_8712

The eggs were whipped until light and voluminous.

IMG_8718

Sugar, oil and vanilla were mixed in

IMG_8716 copy

Then the flour, salt and baking powder was sifted over the mixture and, gently folded in, to maintain the air in the batter.

IMG_8721


IMG_8722

The batter was added to the pan, spread out and the air bubbles tapped out by gently banging the pan on the counter.

It is important to have the next step prepared before the cake is done baking. The cake bakes for ~ 12 minutes in a 350 F oven. It must be turned out onto a towel or parchment paper that has been generously dusted with confection sugar.

IMG_8726

The warm cake was turned out onto the dusted surface and immediately rolled up to cool

IMG_8728

The second element that had to be made in advance, so it had time to cool completely, was the blueberry sauce.

This is straight forward in that the blueberries, sugar, and lemon are cooked for a few minutes, then a cornstarch slurry was added to thicken the sauce

IMG_8735

This, along with the rolled cake, are left in the fridge to set up overnight

The next day, both were left out on the counter to come to room temp, while the whipped cream was made. 1 and 1/2 cup of heavy cream was whipped with some sugar and vanilla. Then the  blueberry sauce was gently folded in

IMG_8754


IMG_8755

I didn’t want the filling to be completely mixed together, so I left it swirled

IMG_8756

The sheet cake had to be unrolled and cut into three equallish pieces!

IMG_8757

The blueberry whipped cream was spread over the slices

IMG_8759

And now it is time to get this cake vertical! The first strip is rolled and aligned with the bottom of the next strip, and the rolling continues. Of course Sally has a great video showing how to do this!

IMG_8760

After the last strip was lined up and all three strips were connected, the cake is set on end

IMG_8761

And placed on a stand, which has to be refrigerated to set before it can be frosted

IMG_8762

The view from the top

IMG_8779

You can see that this is not perfectly round, to say the least,😂

The final step is to make the cream cheese frosting 😋

IMG_8781

I struggled to get this to be smooth, when I frosted it. I colored some of the frosting yellow, since the frosting and cake had lemon in them, and piled some blueberries on top

Oh well! It tasted much better than it looked!

8792

And yes, the layers were vertical!!

Untitled


IMG_8799

The best part of this was the cake! I really liked how easy it was to mix and bake. It rolled beautifully and had a delicious lemon flavor. The frosting was tasty too😍 I was less in love with the filling but that may be due to the fact that I am not a whipped cream lover😉


I am hoping to get the September challenge done in the first half of the month, as we will be traveling the second half and into October💕


Sally’s Baking Addiction: July, 2019 Challenge: No-Bake Cheesecake Jars👩🏻‍🍳

IMG_7682 copy

Boy, did I get lucky this month! 😲 Sally set a really easy and fast challenge for July, which I appreciated! I had a lot going on for the month of July, so a quick, No-bake Cheesecake dessert was perfect timing😊

Three layers, all simple and tasty. First was the two ingredient graham cracker crust.

1 cup (about 8 graham crackers) were crushed in a food processor until crumbs formed, then 2 tablespoons of melted butter were drizzled in until a sandy mix formed.

IMG_7626

Sally used mason jars, but I chose to use some mini dessert cups. These were filled with the crust and set aside until the filling was ready.


The filling is just as simple. 1 cup of cold, heavy cream was whipped into stiff peaks and set aside.

IMG_7630

Using a stand mixer with a paddle attachment, 8 oz. of cream cheese, 1/3 cup granulated sugar, 2 Tablespoons of Greek Yogurt (Sally used sour cream), 1 teaspoon of lemon juice, lemon zest and 1/2 teaspoon of vanilla were mixed until smooth.

IMG_7631

Then the whipped cream was gently folded into the cream cheese mixture.

IMG_7632

This was spooned over the crust filled cups.

I put these into the fridge to set while I made the toppings. I couldn’t decide between chocolate, strawberry or blueberry-so I made all three 😂

IMG_7699

All three of these sauce recipes are from Sally’s site and are super easy to make as well. And, bonus! They are all great over yogurt or ice cream 😋

All that was left was to add the toppings

Chocolate 🍫

IMG_7694 copy

Strawberry 🍓

IMG_7698 copy

Blueberry and lemon 🍋

IMG_7696 copy

These were delicious!

IMG_7689 copy


IMG_7688 copy

Next time I will add more of the crust!

IMG_7684 copy


IMG_7687 copy


IMG_7701


IMG_7690


IMG_7683


IMG_7692


IMG_7682 copy

I have a very busy August as well, so I hope I can keep up with Sally❤️

Sally’s Baking Addiction: June, 2019 Challenge: Angel Food Cake😇

IMG_7153

Yum, Angel food cake 🍰! This is one of my favorites😋

I admit that I have made many angel food cakes in the past. In fact, this time last year, I was working on a gluten free version for a yoga retreat that I was catering. Still, I was excited to bake this one for the June challenge

If you haven’t tried this yet, I definitely encourage you to give Sally’s version a go!. She has a helpful video as well. There are only 6 ingredients needed for this creation.

All the leavening for this cake will come from the whipped egg whites, so you need to start by separating 12 eggs

IMG_7108

It’s very important that no yolk get into the whites, or they will not whip up properly

Set the egg whites aside to come to room temperature, as cold egg whites will not achieve the proper volume for this cake.


This cake is exceptionally light, so regular granulated sugar is too heavy for the batter. I used to just buy super fine sugar at the grocery store, but couldn’t find any😳 Sally has that covered however, as she recommends grinding granulated sugar in a food processor. So, I placed 1 and 3/4 cups of granulated sugar in my processor and let it run until the sugar was a fine consistency.

IMG_7109

Check out the sugar “smoke” coming out of the machine 😂

1 cup of the (now) fine sugar was removed and set aside, while 1 cup + 2 Tablespoons of cake flour and 1/4 teaspoon of salt was added to the remaining sugar, and pulsed to combine

IMG_7110

This is now the dry ingredients that will be added to the whipped egg whites

Now it’s time to beat the egg whites. But, before I added the whites to the mixing bowl, I used a trick that we were taught in culinary school. Egg whites are extremely sensitive to fat, meaning if ANY fat is present in the mixing bowl, they will not whip up.

This is why there can be no yolk in the whites to begin with, and why I always use an acid in my mixing bowl.

IMG_7112

take a cut lemon and rub it all over the interior of the mixing bowl. Do not juice the lemon and don’t worry about any pulp that is left in the bowl


The lemon does not flavor the whites, but the acid will help the whites to climb the bowl as the air is incorporated. Cream of Tartar is added to stabilize the whites as well.

IMG_7113

start the whites and cream of tartar on slow, until bubbles begin to form

Once the whites begin to take on some volume, add the reserved cup of sugar, slowly!

IMG_7116

Do not over whip! The whites need to be at soft peaks, not stiff! This is not a merengue.

IMG_7117

Continue until the whites form a gentle peak, in the above picture you can see how the whites hold shape but the tip curls over.

IMG_7118

IMG_7120

Now that the whites are whipped, the vanilla is added and quickly mixed in. Next the dry ingredients need to be added, in three additions, and folded (carefully) after each addition.

Remember, you don’t want to knock all the air out of the whites!

IMG_7121

1/3 of the dry mix is sifted over the whites, and folded in

After all the dry ingredients are incorporated, it is time to add the batter to the UNGREASED tube pan. If you grease the sides, the batter will not rise up!!!😲

IMG_7122

IMG_7123

Into a 325F oven for about 45 minutes and bake until a toothpick comes out clean

IMG_7124

Immediately invert the hot cake and allow it to cool for about 3 hours, this will prevent the light cake from collapsing on itself

IMG_7125

Run a knife around the outside of the pan and the inner tube to release the cake. I also run the knife across the bottom of the pan

IMG_7146

The cake is great as is! However, I like to add a lemon glaze and some fresh berries 😉

IMG_7148

Then we chow down!


IMG_7162


IMG_7164


IMG_7158


IMG_7155

Another awesome Sally challenge😇

Next month will be Sally’s 30th Challenge!! I am excited to say that I have participated in all of them so far 🌟 Looking forward to the next one!


Sally’s Baking Addiction: May, 2019 Challenge: How To Make Perfect Scones👩🏻‍🍳

IMG_5812

When I saw that Sally had set scone baking as the May challenge, I was both excited and disappointed at the the same time. Excited because I love scones! And so does my family, which means I have baked a lot of scones over the years. I don’t find them to be that difficult, mainly due to all the practice I have had 😂

So I was not expecting this to be much of a challenge. But then I took a closer look at Sally’s recipe. Her method of cutting in the butter (a crucial component to scone baking) was one that I have seen before, but have never tried. More on that later!

The first task was to choose which flavor to make my scones. Sally has quite a large variety from which to select! She has savory recipes as well as the more common, sweet options. We were having house guests this month, so I selected the tried and true, blueberry, which would please all of us for breakfast during their stay.

The first step was to combine the dry ingredients: flour, salt, baking powder, cinnamon and sugar.

IMG_5797

Then I chose to mix the wet ingredients and keep it in the fridge, while I cut in the butter. Keeping everything as cold as possible, for as long as possible is crucial to getting fluffy and light scones. Not an easy job in a hot Tucson kitchen 😆

I mixed the heavy cream, vanilla and egg in a 2 cup measure with a spout. I added another ingredient, not specified by Sally’s recipe: Lemon zest 🍋 I love lemon and blueberries together, so you will see the zest in the picture.

IMG_5798

This was whisked up, and placed in the refrigerator for later.

Now comes the new part, for me anyway. Normally, I will cube the cold butter into smallish pieces and use a pastry cutter to work the small cubes into smaller, pea sized pieces. And, that has always worked well! But Sally, and others that I have seen, will use frozen butter and a box grater. IMG_5800

I admit that this has always struck me as messy and time consuming. And, if you are making more than just 8 scones, it is a lot of butter to deal with! In this recipe, there is only 1/2 cup, or 1 stick. So I decided to give it a go.

IMG_5801

This was added to the dry ingredients and cut into the mix, which did not take long given how small the butter pieces were from the grating process.

IMG_5802

The cold, wet mixture was then added..

IMG_5803

as were the blueberries.

IMG_5804

The batter was stirred until the components came together in a loose ball. This was turned out onto a heavily floured counter, and molded into an 8″ circle. As I mentioned before, this was cut into 8 triangles.

IMG_5805

I put these on a tray and left them overnight in the fridge, as I wanted to bake them off, fresh in the morning, for our guests.

The next morning, the scones were brushed with cream and dusted with course sugar. They were baked at 400F for some amount of time (I forgot to set the timer 😉)

IMG_5810

Until golden brown 😋


Then it was time to chow down!

IMG_5811


IMG_5815


IMG_5816


IMG_5818


IMG_5821


IMG_5825


IMG_5822

So, was it really necessary to grate the butter?

These scones were delicious! No doubt about it! But they were just as tasty as recipes where I just cut up the butter into very small cubes. I would say, if there is a small amount of butter needed, then grating would be fine. But for those recipes where you are making more than just 8 or 12 scones, and you like to cube the butter, then go right ahead. That will be my plan moving forward.

Do try Sally’s scone recipes! I love her flavor combos ❤️


Sally’s Baking Addiction: April, 2019 Challenge: Soft Dinner Rolls with Honey Butter 🍯😋👩🏻‍🍳

IMG_4723

I was thrilled to see that Sally’s Baking Challenge was to be Soft Dinner Rolls this month😊 Our family is very serious about our bread consumption!! This is the house that gluten built 🌾

I bake bread and rolls so often that I keep a wide varitey of flours in my pantry at all times 😂 Of course, Sally provides an excellent video tutorial to help the “yeast adverse” bakers out there. But, honestly, if you are at all worried about yeasted bread baking, this is a very simple and delicious recipe.

There are only 7 ingredients and the dough comes together rather quickly.

I warmed the milk in the microwave until it reached a temp of 100F. I used 2% as that is what we usually have in the fridge. I whisked in 1 tablespoon of regular sugar and 2 1/4 teaspoons of instant yeast.

IMG_4710


As I mentioned before, I bake a lot of bread, so I purchase my yeast in 1lb bags and store them in the fridge. That way I have yeast whenever I need it and I am familiar with how this yeast will perform in my kitchen, every time I bake. It takes a little of the guess work out of yeasted products.

The warm milk, sugar and yeast were allowed to sit for about 5 minutes to activate.


IMG_4711


Sally gave us the option to use either all purpose flour or bread flour. I have several types of bread flour that I like to use, but often go with King Arthur, which I did this time as well.


IMG_4709

Once the yeast was active, I added the rest of the sugar, egg, butter, salt and 1 cup of the flour. IMG_4712

This was mixed on medium for about 1 minute, then the rest of the flour was added. After another couple of minutes, a ball formed and pulled away from the sides of the bowl.

The mixer ran for several more minutes until the dough was properly kneaded.

It was time for the first rising. I placed the ball into a lightly greased bowl, and covered it for 2 hours.⏲

IMG_4713

After the dough had doubled in size, it was time to shape the rolls. I greased a 9 X 13 inch pan and divided the dough into 15 equalish portions.

IMG_4714

I weighed the bowl and dough together, then removed the dough and punched it down, and weighed the empty bowl to ascertain the total dough weight.

IMG_4716

The weight of the dough, divided by 15,  gave me the sum of ~ 50 grams per roll.

IMG_4717

These portions were shaped into balls and placed in the pan for their second rise.

IMG_4718

And, about 1 hour later, ⏲ they were ready for the oven

IMG_4719

The rolls were baked at 350F, on the lower shelf in the oven, for ~25 minutes.

IMG_4720


IMG_4721

Sally’s last suggestion, which was optional, was to melt 2 tablespoons of butter with 1 tablespoon of honey, and spread over the hot rolls. This is optional, yes, but don’t skip it!! So good 😋

IMG_4723

My husband and son really devoured these quickly! I managed to get one of them before they finished them off, and yes, they were deilcious🌟

B07349E8-A313-4B86-858C-1985D385F748

Sally’s Baking Addiction: March, 2019 Challenge: Lemon Bars With Shortbread Crust 🍋

IMG_3323

When I saw that Sally wanted us to make lemon bars, I was not too excited 😏

I love lemon 🍋, but am not a huge fan of shortbread. Just too buttery for me, but it turned out that the crust was not too thick and did provide a nice relief to all that sharp lemon flavor.

Sally has converted me once again! Everytime I think that I won’t like something, I am wrong😂 Now I am a believer!!

There are only 7 ingredients in her recipe, so the quality of each is important🌟

The first step is to bake the shortbread crust. I put the 1 cup of butter into a glass measuring cup, with a pour spout, and melted it in the microwave, just until it was melted (I didn’t want this to boil). While the butter cooled a bit, I whisked up the granulated sugar, vanilla and salt

IMG_3278

The melted butter was added

IMG_3280

Finally the flour was incorporated and stirred into a shiny dough ball, the dough is thick at this point.

IMG_3285

This was pressed into a 9 X 13, parchment lined glass pan

IMG_3287

and baked at 325F for 20 minutes.

IMG_3295

While the crust was in the oven, the filling was prepared. It is also quite easy to assemble!

More sugar and flour were sifted together. I made one small change to Sally’s recipe here and added the zest of the lemons 🍋, I just couldn’t help myself😉

It also turned out that all my eggs were double yolks 😂

IMG_3294

Another important tip Sally gave us was to use freshly squeezed lemon juice. I have to agree with her! I always squeeze it fresh.


After the juice was added, the lemon filling was poured over the warm crust and back in the oven for another 20 minutes, until the center jiggled slightly

IMG_3296

Once the bars were done, they sat at room temperature for 2 hours, then in the refridgerator for overnight. Sally recommends they be refriderated for at least two hours but overnight fit my life better 😊

Then it was time to cut! I pulled them out of the pan using the parchment paper and dusted the bars with powdered sugar

IMG_3298

Then cut into squares, a knife run under hot water helped make this a cleaner job!

IMG_3299

I was happy with the look of these 😊

IMG_3302


IMG_3304


IMG_3315

IMG_3319

IMG_3321

And the taste! 😋✨

If you are a lemon fan, these are for you!