Kaiserschmarren! Hard to pronounce, easy to eat!

IMG_3542

The lovely and talented Karin from The Austrian Dish posted this recipe for a sweet pancake called Kaiserschmarren. I was already thinking about making breakfast for dinner one night since the weather has turned decidedly fall like around here. When I saw Karin’s recipe I had to go for it, even though I had no idea how to pronounce it!

I contacted Karin and asked a few questions which she graciously answered, then set to work! The first step was to rehydrate raisins in either rum, bourbon or water. I chose cranberries because we prefer them, and let them soak in water for 30 minutes while I worked on the next step. I separated the eggs and whipped the egg whites, with a pinch of salt, until stiff peaks formed. The yolks were combined with the sugars and mixed until light, fluffy and pale yellow.

The flour and milk were added to the yolk mixture, alternating between the dry and liquid and mixing between additions. The melted butter was next.

IMG_3522

The egg whites were then folded into the mixture.

So far, this is a fairly straight forward pancake recipe. Until now! The batter is poured into hot pans with tight fitting lids. Karin told me to make sure that the batter was not deeper than 3cm to allow room for puffing up! Which they do, quite a bit. I wanted to use a cast iron pan because that was what I had! I added the batter and scattered the cranberries over the top. I watched them cook, until the bubbles formed to indicate it was time to flip. Karin recommended that they be cut into quarters to make them easier to turn, so that is what I did!

IMG_3530

IMG_3531

IMG_3532

The flip went okish!

IMG_3533

IMG_3534

The cast iron pan did cook a little faster, but we were ok with that. I decided to add some maple sausage and berries to make a full breakfast/dinner.

IMG_3535

IMG_3536

IMG_3538

IMG_3539

IMG_3541

We had some whiskey syrup that we received as a Christmas gift last year. This was delicious on the Kaiserschmarren.

IMG_3546

We will certainly be making and eating this again! Thanks for a great recipe Karin!

IMG_3542

IMG_3543

IMG_3545

SaveSaveSaveSaveSaveSaveSaveSaveSaveSaveSaveSaveSaveSaveSaveSaveSaveSaveSaveSaveSaveSaveSaveSaveSaveSaveSaveSaveSaveSaveSaveSaveSaveSaveSaveSaveSaveSaveSaveSaveSaveSaveSaveSaveSaveSaveSaveSaveSaveSaveSaveSaveSaveSaveSaveSaveSaveSaveSaveSaveSaveSaveSaveSaveSaveSaveSaveSaveSaveSaveSaveSaveSaveSaveSaveSaveSaveSaveSaveSaveSaveSaveSaveSaveSaveSaveSaveSaveSaveSaveSaveSaveSaveSaveSaveSaveSaveSaveSaveSaveSaveSaveSaveSaveSaveSaveSaveSaveSaveSaveSaveSaveSaveSaveSaveSaveSaveSaveSaveSaveSaveSaveSaveSaveSaveSaveSaveSaveSaveSaveSaveSaveSaveSaveSaveSaveSaveSaveSaveSaveSaveSaveSaveSaveSaveSaveSaveSaveSaveSaveSaveSaveSaveSaveSaveSaveSaveSaveSaveSaveSaveSaveSaveSaveSaveSaveSaveSaveSaveSaveSaveSaveSaveSaveSaveSaveSaveSaveSaveSaveSaveSaveSaveSaveSaveSaveSaveSaveSaveSaveSaveSaveSaveSave

A Ferry Ride, A San Juan Cottage and an Amazing Dinner: Day 2

IMG_2601

If you remember from the first post, we had just finished our wonderful dinner and were feeling pretty groggy the next morning from our food coma, that actually started the night before. We decided to head over to American Camp Beach for an early hike to clear our heads. This park has some rather impressive historical roots dating back to the mid 1800s when the military established its presence during the British/US occupation. Today it is just a pretty place to hike around.

IMG_2618

A group of kayakers are getting their safety lecture before heading out.

IMG_2619

The entire shoreline is covered with fort structures made from the huge supply of driftwood.

IMG_2630

We don’t get huge breakers on the sound, but look at the mountains in the distance!

eagle

We saw several bald eagles and tried to get a closeup of two of them before they pecked our eyes out.

We were feeling considerably more awake as a result of dodging eagles and tourist with paddles, we headed back to the cottage to get ready for a round of golf.

IMG_2600

I promised a tour of the cottage in the first post, so here it is!

IMG_2611

The front, and only door, is on the left and the “kitchen” is to the right. The door has a gorgeous window!


IMG_2612

If you turn to the right from the “kitchen” you see the bathroom and bed. Look at that window!

IMG_2615

Then you turn back, and that is pretty much it!

Like I said before, it is small but the architecture allows for a lot of light, and it is really cozy. What is really stunning about the property is the location and views-more on that in a moment. Another bonus is that it is just 1/4 mile from the only golf course on the Island. We had a 1pm tee time.

I did not take a lot of pictures of the course because, well, it ain’t that pretty! I warmed up in the putting and chipping areas.

golf 3

It was a good course for me, the beginner, because there were not too many trees, water features or sand traps. But, this was an 18 hole course with some long drives, so I did not play every hole. I did drive the cart and managed to sneak some action shots of my hubby.

golf 1

golf 2

He looks like he is going to crush this ball

It was fun and very hot! We went back to the cottage and I took some photos of the beautiful property.

IMG_2638

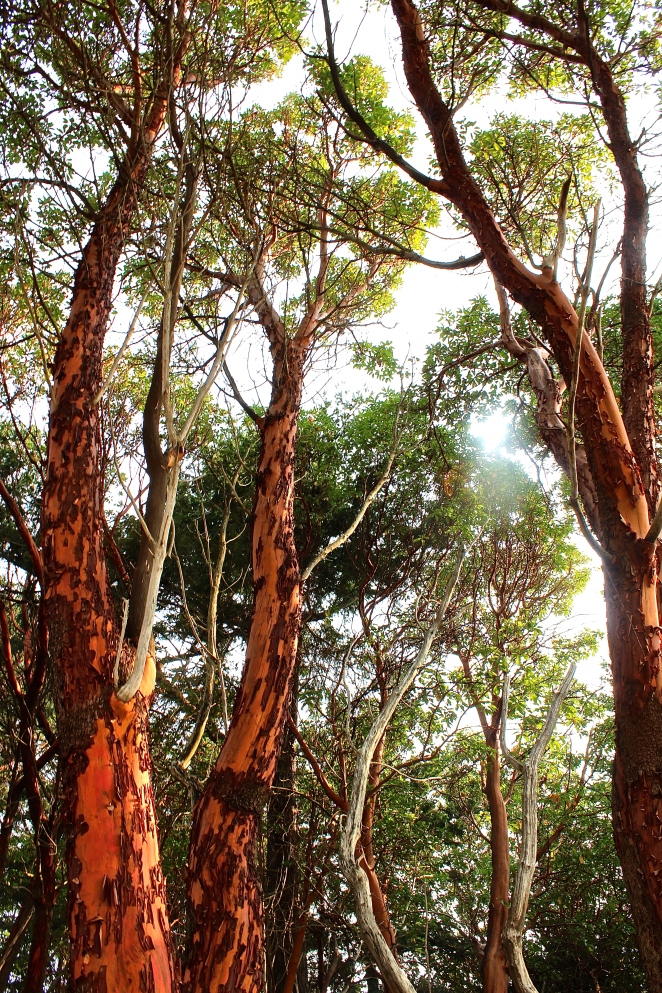
I absolutely love these trees. They surround the cottage.

IMG_2639

IMG_2643

IMG_2644

IMG_2647

We are up on a hill overlooking the water.

IMG_2602

This is the view from the deck on one side.

fh2

And the view from the other side.

The woman who owns this property has a second rental right next door and a beautiful garden, I had to take pictures of that as well! All the islands in the San Juans grow lavender. There is so much of it I would say it is the primary crop here. There are lavender baked goods, soap, bath salts….anything you can think of will have been infused with the scent.

IMG_2650

IMG_2652

IMG_2654

IMG_2684

The bees love it so there is plenty of lavender honey for sale!

The owner has many wonderful and unique plantings throughout the garden.

IMG_2662

IMG_2656

IMG_2667

IMG_2666

IMG_2682

There was a trellis that caught my eye. As I swung my camera up I spotted one of the largest bee hives I have ever seen.

IMG_2668

I got a little closer

IMG_2669

At this point we believed it was an abandoned hive and I tried to talk my husband into climbing up and using his head for scale. Then we saw this…

IMG_2671

IMG_2672

Obviously there were occupants at home and my hubby said it was a “no go” to the climbing up part. We estimate that the hive is just a little smaller than an adult head!

IMG_2675

The rest of the garden was not as scary!

IMG_2678

IMG_2685

IMG_2687

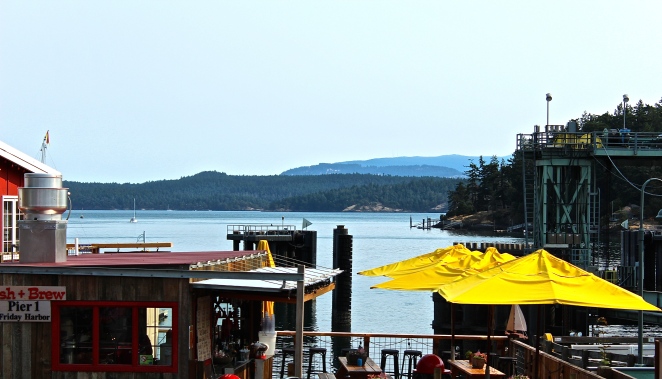
We ended this day with a light meal and happy hour at a beautiful spot over looking the ferry dock.

ferry-from-above.jpg

We watched the float planes, which were constantly present, land and take off.

plane 2

plane 1

Sorry about the quality of these photos, the planes were fast, I only had my cell phone and the happy hour drinks were starting to kick in!

The next morning it was time to head back home. We parked our car in the ferry line and set out on foot to find some breakfast. Cafe Demeter is the best bakery on the Island and just a few steps from the ferry dock. We have been here before and the wait in the long line is completely worth it! Highly recommend this one!IMG_2691

After my breakfast pizza, which I ate before I took any pictures, we wandered around town and checked out a few other places that are near the dock.

IMG_2693

This houses many little shops to browse or pick up a last minute souvenir-probably something with lavender!


IMG_2694

Also a great place for coffee or breakfast. It is also open for lunch and dinner.

IMG_2696

IMG_2697

We have not dinned here but I have heard good reviews.

IMG_2700

Remember the ice cream we had on day 1? This is that shop but if you go remember they only take cash!

IMG_2701

We had lunch at this spot last year, it was ok.

IMG_2699

On the look out for our ferry at this pretty spot

Our ferry arrived right on time

IMG_2721

IMG_2722

We said good bye for this year.

IMG_2752

Friday Harbor is just one side of the Island of San Juan. Roche Harbor is on the opposite side of the Island. It is just as pretty but maybe a little more effort to get there. Abbey from abbeyco is a boater who lives here in Seattle and happen to be visiting Roche while we were in Friday Harbor. If you would like to see more about that side of the Island, check out her post. She has great pictures and an adorable little girl too!

So it is good bye for now, until next year…..

me on the beach


Is it a biscuit or a savory scone?

IMG_2417

I have been noticing recipes for savory scones for quite some time, and they are fantastic! I have made a few of those recipes and have really questioned the difference between biscuit baking and scone formulas. They have the same basic ingredients: flour, leavening agent, salt, butter and milk or buttermilk. Sugar seems to be a key difference in that biscuits have less than scones, yet savory scones have very little sugar as well. Then there is the similarities in the basic method. Both biscuits and scones have cold butter (some biscuits have cold shortening in some combination as well) which is a requirement if you wish to have light, flaky products. So, when do you call it a biscuit and when should it be referred to as a scone? Here is the rule at our house: if it’s dinner time then it is a biscuit, and if it is breakfast or brunch, then it is a scone. Either way, these are delicious!

These are made with roasted sweet potatoes. I word about this ingredient. I know that different areas of the country call these by various names. Whether they are called yams or golden sweet potatoes really doesn’t matter because they all taste great. I like to use the orange sweet potatoes from my local grocery store because of the color of the biscuit/scones.  Whichever you choose, you can’t go wrong!

Begin by preheating an oven to 425°F and roasting your yam or sweet potato until it is soft to the touch. Allow it to cool completely.

IMG_2379

IMG_2382

The vegetable is combined with fresh ground nutmeg and buttermilk and ground in a food processor until smooth.

IMG_2387IMG_2388IMG_2389

I also use the food processor to combine the flour, baking soda, brown sugar, cinnamon, allspice and salt. This mixture is quickly pulsed to mix.

IMG_2380

1 1/2 sticks of cold butter is added and pulsed until it is the size of small marbles, or peas.

IMG_2383IMG_2384IMG_2385

The two mixtures are combined until a soft, sticky dough forms.

The dough is turned out onto a floured board. Resist the urge to use a rolling pin as the dough is too soft and tacky to roll out. Using floured hands, pat the dough into a circle, approximately 3/4 of an inch thick and, using a 2 1/2 inch floured, fluted biscuit cutter, punch out the discs.

IMG_2395

IMG_2397

IMG_2398

Just to confuse the biscuit/scone controversy even further, I brushed the tops with melted butter (like a biscuit) and sprinkled them with vanilla sugar (like a scone).

These were baked at 425°F for 25 minutes.

IMG_2406

They are nice and light, just as a biscuit or scone should be, and they rose nicely with many layers.

IMG_2412

IMG_2409

IMG_2417

Whatever you choose to call them, you will be happy you gave them a try!

IMG_2407

IMG_2415

IMG_2411

Sweet Potato Savory Scones

  • Servings: about 12, 2 1/2 inch scones
  • Difficulty: easy
  • Print

These savory pastries are a flavorful addition to your dinner or as a slightly sweet treat at Sunday brunch

Credit: Invisible-no-more.com

Ingredients

-1 lb sweet potatoes, 2-3 small potatoes or 1 large one

-1/4 teaspoon nutmeg, freshly grated

-2 to 4 Tablespoons buttermilk, cold

-2 1/2 cups all purpose flour

-3 Tablespoons brown sugar

-1 1/2 teaspoons baking soda

-1 teaspoon ground cinnamon

-1/4 teaspoon allspice

-3/4 teaspoon kosher salt

-1 1/2 sticks butter, cold

Directions

  1. Preheat the oven to 425°F. Poke the potatoes with the tines of a fork and bake until tender, about 40 minutes to 1 hour. Allow the potato to cool and then peel and add to the bowl of a food processor. Add the nutmeg and 2 Tablespoons of the buttermilk. Process until smooth and add more buttermilk, 1 Tablespoon at a time, to thin the puree if needed. Set aside.
  2. Add the flour, sugar, baking soda, spices and salt to the bowl of a food processor and pulse to briefly combine. Add the cold butter and pulse until the butter is the size of small marbles or peas. Fold in the sweet potato mixture until just combined, do not over mix.
  3. Turn out the soft, sticky dough onto a well floured counter top. Pat the dough, with floured hands, into a disc 3/4 inch thick. Cut out scones with a 2 1/2 inch biscuit cutter. Place on a parchment paper lined baking sheet.
  4. Brush the tops with melted butter and sprinkle with vanilla sugar. Bake at 425°F until golden brown, approximately 20 minutes.

ENJOY!

SaveSave

Maple Oatmeal Scones

IMG_1823

This is my family’s all time scone request. They never seem to get tired of this wonderful combination of oats, maple syrup and frosting, so much frosting! This recipe is adapted from Ina Garten, I really change very little and if you follow her recipe to the letter, you will not be disappointed! I decided to write up the recipe anyway for a couple reasons. For one, a few people asked my to and for another, I wanted to work on my short coding skills. I am new to using html code to embed recipes and would like to practice this skill.

This recipe comes together so easily that I did not take many production photos. The dough is sticky but it does have a major advantage in that you can mix and cut the scones out ahead of time and keep them in the fridge (or longer in the freezer) and bake off what you need in the morning.

IMG_1819

I wrap the scones loosely with plastic wrap the night before

The next morning I select the amount I want and transfer to a new pan with a parchment paper.

IMG_1821

You have a couple options here. You can brush the tops with an egg wash to facilitate browning. I recommend that if you plan to leave them plain or add a light glaze. Since I am using a frosting consistency, the tops are not visible, I omit the egg wash.

After the scones have cooled completely, add the frosting. Bonus: these are fantastic with coffee!

IMG_1822


IMG_1823


IMG_1829


IMG_1828


IMG_1824


IMG_1831

Enjoy!


IMG_1838

Maple Oatmeal Scones

  • Servings: About 24, 21/2 inch scones
  • Difficulty: easy
  • Print

Pure maple syrup, buttermilk and oats combine to give these scones a sweet flavor and nutty texture

 credit:Ina Garten

Ingredients

-3 1/2 cups all purpose flour

-1 cup whole wheat flour

-1 cup old fashioned oats, plus extra for garnish

-2 Tablespoons baking powder

-2 Tablespoons vanilla sugar

-2 teaspoons kosher salt

-1 pound, cold unsalted butter, diced

-1/2 cup cold buttermilk

-1/2 cup pure maple syrup

-4 extra large eggs

frosting:

-1 1/4 cups powdered sugar

-1/2 cup maple syrup

-1 teaspoon pure vanilla extract

Directions

  1. Preheat the oven to 400°F.
  2. In the bowl of an electric mixer, fitted with the paddle attachment, combine the flours, oats, baking power, sugar and salt. Blend the cold butter into the dry ingredients, starting on low speed, until the butter is the size of peas.
  3. Separately combine the buttermilk, maple syrup and eggs. Add to the butter flour mixture and combine just until incorporated, this dough will be sticky.
  4. Dump the dough onto a well floured counter top and pull the dough together. Working with floured hands, pat the dough into a 3/4 inch round and cut out scones using a 2 1/2 inch biscuit cutter. Place the scones onto a baking sheet lined with parchment paper. Bake the scones for 20-25 minutes until browned.
  5. Make the icing: use the proportions listed to make a thin glaze which can be drizzled over the scones once they have cooled. Or adjust the proportions to create a thick frosting consistency by adding more powdered sugar than listed. Sprinkle with oats for garnish.


I prefer to use old fashioned oats instead of instant as they add more texture. Also, if I were making a thin glaze where the top of the scone would show, then I would use an egg wash before baking to give the tops a nice brown color.

Another time saving tip that I often use is to make the scones ahead of time by cutting our the scones and placing them all on one pan, wrapping with plastic wrap and storing in the refrigerator. The next day I can bake off all or some of the scones. They will store in the refrigerator for a week or longer in the freezer, if needed.


SaveSave

SaveSave

Our Yoga Retreat Wrap Up!

We finally made our way back to Seattle, which thanks to Trump and his new policy made it quite difficult as we were swept up in the protest at SeaTac! But, mine is not a political blog and I will leave that story for someone else to tell!

I spent our first day back much like anyone else arriving home after a week away. I did bills, laundry, grocery shopping and a run to Costco to stabilize the household. Now I have a moment to describe the last two days of our retreat.

Thursday morning we got an early start, to beat the heat, and went on a hike to an abandoned hotel. Palm Royale did not survive for long. The story that was told is that the hotel was finished and was scheduled for a soft opening. However, the workers were not paid the wages they were owed and they decided to dynamite the only road leading to the hotel to protest the lack of reimbursement. The developers never reopened! Now, I don’t know if that story is true but it is certainly colorful. The hotel sat at the top of a mountain and the views were outstanding!

dscn2091

We arrived at the top just after sunrise

dscn2092dscn2093dscn2094

dscn2095

This is a birds’ eye view of the shoreline where we met our boat for the snorkeling tour

dscn2099

As you can imagine, this is a favorite hang out for local teens to tag and party!

We made our way back down and headed over to La Cumbra for breakfast. This restaurant is located in a gated community consisting of condos mostly owned by Americans who have retired and relocated, at least for some of the year, in Mexico.

dscn2109

The view from our table located outside on the patio

dscn2112dscn2110

dscn2111

This is a small portion of the full condo complex

We were told about a bridge on the property that had been damaged, some years ago, by a hurricane and had never been repaired. So, of course we had to go investigate after our meal.

dscn2115

It did not look to bad yet!

dscn2118

dscn2119

We started to see what they meant!

dscn2121

It was stabile enough for us to cross one at a time, and the view on the other side was worth it!

That evening we had a special treat. A local woman came to our condo to teach us all how to make authentic Mexican tamales and enchiladas. I am not a big fan of Mexican food in general but do love to learn how to properly cook alternate cuisine, so I was very excited to learn from her. She is the “lunch lady” at the local elementary school down the road from our hosts. She brought a mix of masa, which is corn meal, flour and lard, and a variety of fillings for the tamales and enchiladas. She then proceeded to show us how to construct and cook the dishes, she even brought her personal steamer which was large enough to hold all 24 tamales.

With the tamales done, it was time to work on the enchiladas.

Of course, no Mexican meal is complete without home made corn tortillas. I got to try my hand at making these. The mixture was just corn meal and water, no lard this time! I rolled them into a ball, then pressed them with a traditional wood press. We then cooked them off in a dry sauté pan. It was actually surprisingly easy!

We ate, too much, then went to evening yoga and meditation. The next day was our last full day in El Naranjo. I skipped yoga in lieu of one last run in the warm weather! I ran 5 miles and then jumped in the pool! After breakfast we headed to the Tortugario Ecological Center of Cuyutlan. This is a sea turtle preserve and plantation. We were treated to a boat ride in the mangroves to search out snakes, birds, iguanas, turtles and crocodiles.

The turtles were easy to find, the other animals, not so much!

dscn2157dscn2160

dscn2161

The large adults in their holding tanks would swim right up to the edge to check us out

dscn2164

dscn2170

These cute little guys hatched not too long ago

dscn2169

dscn2173

The eggs are protected by fencing and marked with plastic buckets

dscn2174

We made our way to the boat and got our first glimpse at the mangroves and tropical forest

We saw many birds and a few iguanas that hid too far back into the jungle to photograph. We did catch a couple interesting sights.

dscn2178

Two Great Snowy Egrets

dscn2187

This little croc was hiding in the reeds trying to cool down.

dscn2188

dscn2204

These are two of the biggest termite nests I have ever seen!

dscn2207

The tour was at an end. So, you know when you take your kids to the zoo which ends with the obligatory trip to the gift shop, and they want everything in sight? Well, you won’t have that problem at this gift store!

We had one last evening yoga session that night and prepared to leave paradise the next day. We had a blast on this retreat! Our hosts, Susan Lewis and Bill Pecha are amazing! They provided all the meals, transportation, lodging and excursions-this was truly all inclusive and can they cook! The food was amazing, better than any of the restaurant meals that we had! They worked with our yoga teacher, Lisa Kaulen, to put together a great week of activities that kept us motivated and engaged. We highly recommend this type of trip if you want to see some place that is not just the regular touristy sights, and enjoy physical activity!

Good Bye El Naranjo!

Chia Seed Pudding

Overnight oats are everywhere right now. I understand the appeal, set it up the night before and save time in the morning while enjoying a healthy breakfast that’s quick and easy. Personally, I like to have my oatmeal for lunch and I have the time to make it and have it while it is hot so I have not been tempted to try one of these recipes. However, the chia seed pudding dishes that have come across my Pinterest and Facebook feeds intrigued me. I am not a huge fan of pudding per se but do love chia seeds and add them to other recipes when I want to boost the fiber content or need a healthy thickening agent. So, when I saw this particular recipe I decided to give it a try, with a couple modifications.

dscn1960

My Recipe

3 T. chia seeds

¾ c. cashew milk (I use Silk)

1 T. Bourbon maple syrup

¼ t. Vanilla bean paste (substitute ½ t. vanilla extract if you can’t find vanilla paste)


dscn1962


Mix the ingredients and refrigerate overnight.

Pretty straightforward, of course the website used a mason jar, which seem to be the trendy thing to do right now. I used a regular cereal bowl and covered it with plastic wrap, and that was just as effective.


I was a little worried when I saw the texture the next day, it looked a bit gelatinous for my taste, but my concern was unwarranted as it was delicious!


I added banana, pecans and blueberries but many other additions would be just as tasty.

dscn1969

I will make this again for a healthy meal, but don’t be fooled by the health halo! The recipe made as written is 375 calories, after the additional topping you are pushing 500 calories, far too much for a snack, but appropriate for a light lunch or dinner.

I hope you give it a try, it’s easy, tasty and has the right amount of healthy energy to keep you going!

Nutritional info:

Calories:         375

Protein:          17g

Fiber:              11g


Maple Oatmeal Scones and Cinnamon Star Bread

scones-1

Long before there was the Food Network or The Cooking Channel there was a little show called Martha Stewart Living. There was nothing else like it at the time and the only broadcast that really showcased recipes and home decorating. It began in 1993 and was very popular moving into the late 90s and early ‘00s and, of course, predated the Internet before it exploded and was readily accessible to everyone. And, no dial-up service does not count! Martha had really cornered the market at that time and it was a big deal if she endorsed or promoted a chef or product. I was busy working full time and raising two toddlers with barely a moment to breath, but I never missed Martha’s weekly show. I didn’t have the time, equipment, culinary skill or money to make her recipes but tried to learn as much as possible. One day she introduced a woman who ran a specialty food store in East Hampton called The Barefoot Contessa. Ina Garten came on the show and I don’t remember exactly what she made for Martha, but she had my attention. Her show began in 2002 on the Food Network and I have been making her recipes every since.

Back in the early ‘00s the Food Network had shows that were hosted by accrediated chefs to teach skills and techniques that were helpful for home cooks and I tried to absorb all that great information. Now, they give cooking shows to celebrities who have no actual culinary credentials. It’s like when MTV used to play music vidoes instead of the train wreck, “reality” TV programming you find there today. But, I digress!

One of my favorite Ina recipes is her Maple Oatmeal Scones. I have made them so many times over the years that I (almost) don’t need the recipe anymore. I make them for Christmas gifts for our good friends that we see each year over the holiday time frame. There are three of us couples and we take turns hosting a dinner. I hosted last year so tonight we head over to one of their homes. We have a real gift for the other two couples but, if I don’t bring a baked good, the gift will be incomplete.

This recipe comes together quickly. Combine the dry ingredients, add the butter and cut into the dry until the size of peas. I go with very large peas!

Combine the buttermilk, maple syrup and four eggs and mix well

wet

add this mix to the dry and expect an extremely sticky batter!

scones-4

I use a lot of flour and pat into a big circle, about ¾ inch thick. You will not be able to knead this dough, its way too sticky. Have lots of flour on hand!

I used a 2 ½ inch round cutter and had a yield of 20 big scones. Be careful to not twist your cutter when stamping out the scones, or you will seal all those great layers that you worked so hard to create!

I made the glaze with the powdered sugar, vanilla and maple syrup but I like a nice, thick glaze, really more like icing, so I used less syrup and just eyeballed the amount until I hit the consistency I wanted.

This slideshow requires JavaScript.

Thank you, Ina!

Another delicious recipe I found was Cinnamon Star Bread. I was not going to review this originally so there are no production photos. My family really flipped over this bread so I felt it should be included. I know that there are a lot of star bread recipes out there and I have made savory ones myself but this dough was amazing to work with! It came together quickly and, even though it was cold in my home, the dough rose well with a little extra time. It rolled out nicely after resting and it will be my new go to star bread formula from now on.

It baked up nice and golden and then I added lots of powdered sugar.

I highly recommend both these recipes and hope you enjoy them!